
Endless Scrolling Starfield in Unity

Platform: Unity3D
Language: C#
Requirements:
Pixelplacement’s iTween Plugin
Recommended album to listen to:
Uriah Heep – Look at Yourself

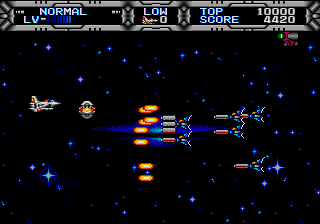 Many classic, scrolling arcade space shooter games used a technique that is commonly known as an endless starfield. It is a backdrop that is continually generated as players direct their ship through space, annihilating swarms of approaching enemy vessels. The traditional techniques that were typically applied to create these endless animated backgrounds at a minimal cost no longer work in modern environments, especially in game object-oriented frameworks like Unity, Unreal or Lumberyard. Time to remedy this because scrolling 2D space shooters are still every bit as much fun as they were 30 years ago.
In the olden days, starfields were created by writing individual pixels, representing the stars directly into the screen buffer. They were moved at different speeds with each frame update to create the illusion of depth. Because the screen coverage was much lighter than drawing a background consisting of bitmaps and required only individual pixel draws for the stars, it was extremely effective and freed up valuable CPU time for more important things, such as more enemies, explosions, and action on the screen.
We are no longer directly working with screen buffers in today’s world and the classic technique no longer works as such. But then again, perhaps it does. All it needs, really, is a slightly new perspective how to tackle the problem, and, using the processing power of GPUs, we can do a whole lot more, creating an endlessly scrolling starfield that is a feast for the eyes.
We can add various effects to give it depth and wonder—just take a look at some photos taken by the Hubble telescope and you’ll see how vibrant and colorful space really is. Ultimately, your imagination is the only limit in terms of some of the effects you might try to recreate.
The Approach
A good-looking starfield will require a couple of hundred stars, if not thousands, in various sizes an colorations. We could create a couple of sprites and plaster them on the screen, but having a thousand game objects in your Unity scene, just to provide a backdrop is a bit excessive and unmanageable, not to mention the processing overhead this would incur, having to regularly update the thousands of scripts that would accompany each individual game object. Fortunately for us, Unity already has a component that is tailored to creating thousands of individual objects on the screen, fully optimized for performance—the Shuriken Particle System.
Ordinarily, a particle system is set up so that it will continuously emit particles that are then moving around the screen in a fashion that is determined by the many, many parameters the component provides. As such, particle systems can be very overwhelming and it may, in fact, be a component you have as of now stayed away from. The good news is that we won’t be dealing with any of the confusing parameters. In fact, we’ll turn the entire particle system emission process off and instead, we will simply make use of its rendering capabilities so we can draw hundreds of stars on the screen in a single batch. It does not get much more efficient than that, so let’s get to it.
Getting Started
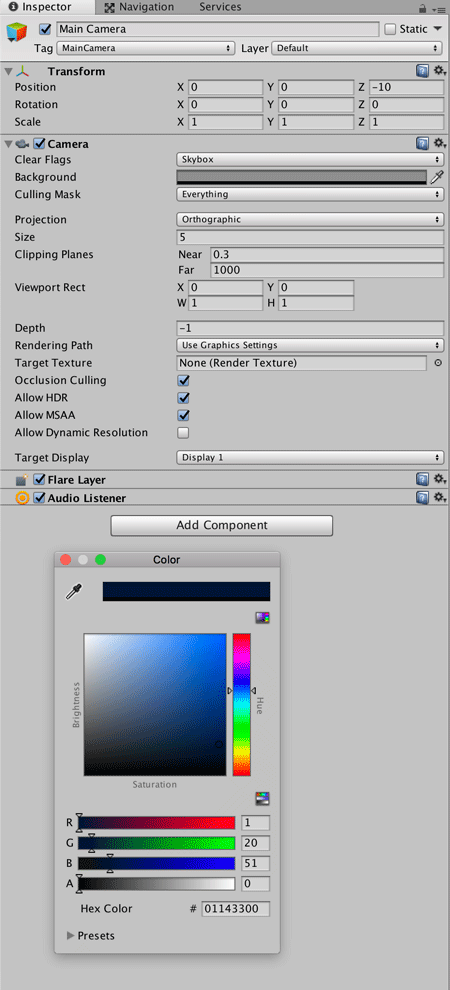
Let’s create a new 2D scene adjust the camera like in the screenshot below, creating a simple dark blue color backdrop.
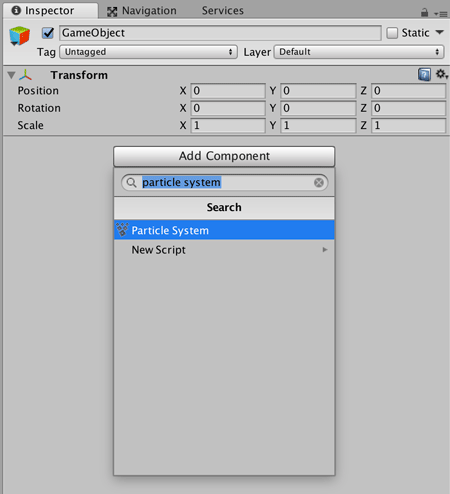
Then we add an empty game object to the scene in the Unity editor and add a Particle System component to it via its “Add Component” button. Make sure to disable everything in the component settings, except for the Render entry.
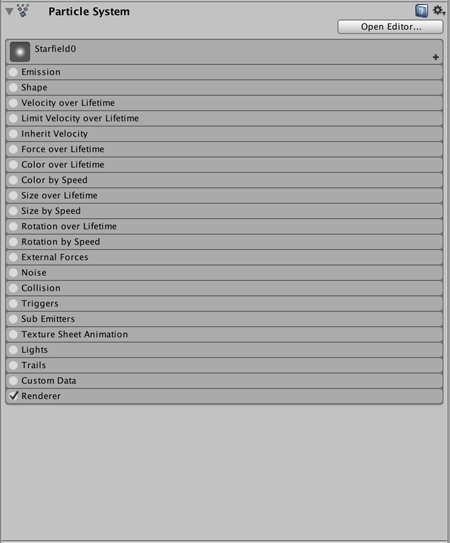
In the Render portion of the Particle System, select the Default Particle Material, which, by default, creates a small circle with soft edges, using an alpha blending shader that is optimized for particles. Ideal for what we’re trying to do for now. Later, if you want to go for a different look, it’s easy enough to simply create a custom material and even use actual sprites to use as particles, but for the time being, let’s keep it simple.

The next step is to turn off the particle system’s “Play on Awake” checkbox, which can be found towards the bottom of its main settings. We now have a particle system in place that does not emit any particles and doesn’t really do anything. Instead, we create a script, I called it Starfield.cs, that will create individual particles and assign them to this particle renderer. [Note: If you see only pink boxes in your scene window, it means you have forgotten to assign a material to the particle renderer.]
using System.Collections;
using System.Collections.Generic;
using UnityEngine;
using UnityEngine.Assertions;


public class Starfield : MonoBehaviour
{
	public int		MaxStars = 100;
	public float	StarSize = 0.1f;
	public float	StarSizeRange = 0.5f;
	public float	FieldWidth = 20f;
	public float	FieldHeight = 25f;
	public bool		Colorize = false;

	float xOffset;
	float yOffset;

	ParticleSystem						Particles;
	ParticleSystem.Particle[] Stars;


	void Awake ()
	{
		Stars = new ParticleSystem.Particle[ MaxStars ];
		Particles = GetComponent();

		Assert.IsNotNull( Particles, "Particle system missing from object!" );

		xOffset = FieldWidth * 0.5f;																										// Offset the coordinates to distribute the spread
		yOffset = FieldHeight * 0.5f;																										// around the object's center

		for ( int i=0; i<maxstars; i++="" )="" {="" float="" randsize="Random.Range(" starsizerange,="" starsizerange="" +="" 1f="" );="" randomize="" star="" size="" within="" parameters="" scaledcolor="(" true="=" colorize="" ?="" -="" :="" 1f;="" if="" coloration="" is="" desired,="" color="" based="" on="" stars[="" i="" ].position="GetRandomInRectangle(" fieldwidth,="" fieldheight="" transform.position;="" ].startsize="StarSize" *="" randsize;="" ].startcolor="new" color(="" 1f,="" scaledcolor,="" }="" particles.setparticles(="" stars,="" stars.length="" write="" data="" to="" the="" particle="" system="" getrandominrectangle="" ----------------------------------------------------------="" get="" a="" random="" value="" certain="" rectangle="" area="" vector3="" (="" width,="" height="" x="Random.Range(" 0,="" width="" y="Random.Range(" return="" new="" xoffset="" ,="" yoffset,="" 0="" <="" pre="">
The Starfield explained
The first portion of the code creates a few variables with default values that can be edited directly in the Unity editor. This allows us to fine-tune things as we go along.
	public int		MaxStars = 100;
	public float	StarSize = 0.1f;
	public float	StarSizeRange = 0.5f;
	public float	FieldWidth = 20f;
	public float	FieldHeight = 25f;
	public bool		Colorize = false;
In the Awake() method, the actual initialization of our game object at the beginning of the game, we then create an array of particles and fill it with randomly created “stars.” In order to make the starfield look more natural, we vary the size of the stars we create. The variable StarSize determines the average size of stars, whereas the StarSizeRange variable serves as a modifier to randomly scale the stars within the range of the modifier.
float randSize = Random.Range( 1f - StarSizeRange, StarSizeRange + 1f );
If StarSizeRange is set to 0.5, for example, the random values we generate will lie somewhere between 0.5 and 1.5. If we change the value to 0.2, on the other hand, the range will be between 0.8 and 1.2. We then use this random value as a multiplier to modify the actual size of the star we are generating.
Stars[ i ].startSize = StarSize * randSize;
In the loop, we also select a random position for each star we generate and, if so desired, colorize the star. In nature, stars begin to have a slight red shift the further away they are—yes,I am extremely simplifying things, I know, but it will do for now. The code can apply such a shift depending on the size of the star, which I take as an indicator of how far away it is. We do this by leaving the red component of the color at a maximum while reducing the green and blue components slightly.
	float scaledColor = ( true == Colorize ) ? randSize - StarSizeRange : 1f;
	Stars[ i ].startColor = new Color( 1f, scaledColor, scaledColor, 1f );
Once all the stars have been initialized, they are written to the particle system we previously added to our game object. Run the program and you should see something that looks kind of like this…

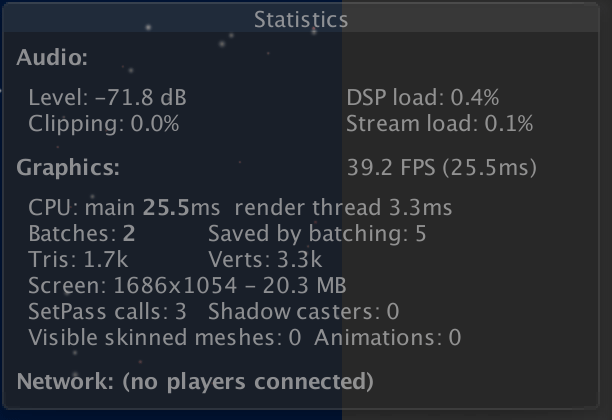
If you check the stats in Unity’s Game window, you will see that all these many stars are drawn on the screen in a single render batch, using full GPU acceleration. The reason the display will say that two batches are active is that even in an entirely empty scene, Unity will always generate one batch to render the background color.
Time to Move
The real coolness of starfields is not effected by the stars alone, though. Their real beauty unfolds when motion is involved, so let’s write a small scrolling script that moves the camera up along the y-axis at a steady pace, thus “flying” across the stars we produced. I call it FixedScroll.cs and attach it to an empty game object.
using System.Collections;
using System.Collections.Generic;
using UnityEngine;

public class FixedScroll : MonoBehaviour
{
	public float			theScrollSpeed = 0.025f;

	Transform 				theCamera;

	void Start ()
	{
		theCamera = Camera.main.transform;
	}

	void Update ()
	{
		theCamera.position = new Vector3 ( theCamera.position.x, theCamera.position.y + theScrollSpeed, theCamera.position.z );
	}
}
This script has a variable that can be edited in the Unity editor to determine the scroll speed and during every Update() call, it simply increments the y-position of the camera. Couldn’t be simpler, really.
I could have also left the camera static and instead move the starfield, but if you want to use this effect in a scrolling shooter game, your camera is most likely attached to the player’s ship, moving around, creating the scrolling effect. Therefore, an implementation in which the stars remain static while the camera moves seemed more sensible to me, just like it would be in a game level.
The theCamera variable is used to speed up access to the camera position and avoid having to go through five levels of object hierarchy every time we update the frame. These types of hierarchy walks (Camera -> main -> transform -> position -> x/y/z) are extremely slow because they will regularly thrash the CPU’s cache, forcing the processor to wait for the data to be loaded into its internal memory cache for every step. Using an intermediate variable helps mitigate that somewhat and is a coding practice I use very frequently as a manner of routine.
When you start the program, you will now see that the stars are actually floating across the screen as the camera moves, but as soon as the camera leaves the area in which we created the initial stars, the screen will be empty. We need a way to fill in new stars as we go.
There are two basic approaches to this. Either we create new stars and fill them in the area above the screen before they become visible, or we recycle the stars we already have. And that’s what I’ll do because it is so much easier and elegant. (Note: Before you ask, yes, that means they will be in a repeating pattern but, no, people won’t notice because with everything else going on, they won’t be able to concentrate on specific stellar constellations that fly by among hundreds of other stars by the time we’re finished.)
To recycle the stars, we need to create an Update() routine in our Starfield.cs file, that is called periodically, and check which stars have moved out of view at the bottom of the screen. We then take these stars and simply feed them back in at the top. This is achieved by simply comparing the camera position to the position of each star as well loop over them.
	void Update ()
	{
		for ( int i=0; i<maxstars; i++="" )="" {="" vector3="" pos="Stars[" i="" ].position="" +="" transform.position;="" if="" (="" pos.x="" <="" thecamera.position.x="" -="" xoffset="" }="" else=""> ( theCamera.position.x + xOffset ) )
			{
				pos.x -= FieldWidth;
			}

			if ( pos.y < ( theCamera.position.y - yOffset ) )
			{
				pos.y += FieldHeight;
			}
			else if ( pos.y > ( theCamera.position.y + yOffset ) )
			{
				pos.y -= FieldHeight;
			}

			Stars[ i ].position = pos - transform.position;
		}
		Particles.SetParticles( Stars, Stars.Length );

	}
</maxstars;>
As you can see, I have also added checks for x coordinates to make it possible for this script to handle movement in any direction and continuously fill in stars on any of the four sides of the screen as they fall out of the view on the opposite side.
Run the code so far and take a close look. In your Scene window, you can perfectly watch how the stars disappear and pop back up at the top.
We Need More Depth
This is not bad, but we’re still missing one key ingredient. Depth! A killer starfield has depth and looks like a peek out the porthole of the USS Enterprise. We can do this, too.
In Unity’s Shuriken Particle System, every particle has its own velocity vector and we could use that vector to move every single particle at a different speed trying to create the illusion of depth. After plenty of experimenting, however, I found that it is rather tedious in a 2D space, to properly tweak all these velocities to get a uniform look that matches the desired effect rather than random spots streaking randomly across the screen.
 A much more effective way, I found, is to use a few parallax layers, each representing a different viewing distance. Remember, what we are really trying to reproduce is a camera frustum, which means that we should really be seeing fewer stars that are close and a great many more stars that are further away.
In plain English, this means that we will create different layers of stars representing different viewing distances. In the closest layer we will keep the stars fewer, larger and faster, while we will fill the layers further back with many more stars, but keep them smaller and much slower-moving.
To allow for an individual movement speed of each layer, we will introduce an additional public variable in our Starfield.cs script, called ParallaxFactor, that can be adjusted in the Unity editor.
public float ParallaxFactor = 0f;
By default, this factor is zero, which means, the layer is locked in place and the stars will fly by at the same speed that the camera pans across the layer. If use a factor of 0.5, however, the stars will travel with the camera at half its speed and therefore appear to be moving at half the speed also. Similarly, a factor of 1.0 will lock the stars to the camera so they won’t appear to be moving at all.
To calculate the proper position of each layer, during the Update() method call, we simply multiply the camera position by our parallax factor and make it the position of our game object.
		Vector3 newPos = theCamera.position * ParallaxFactor;					// Calculate the position of the object
		newPos.z = 0;						// Force Z-axis to zero, since we're in 2D
		transform.position = newPos;
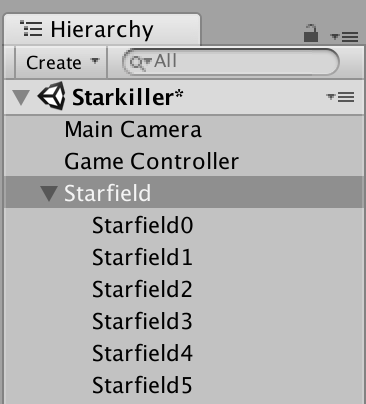
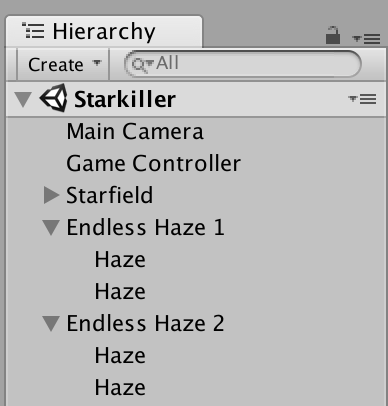
The next step is to create a number of Starfield game objects in the Unity Editor and assign them proper values to create our starfield. In my case, I created an empty parent object under which I inserted all the individual starfield layers to keep the hierarchy clean.
The most important thing now is to set up the parameters in such a way that it creates the desired effect of depth. Here is how I filled my parameters for an effect I like.
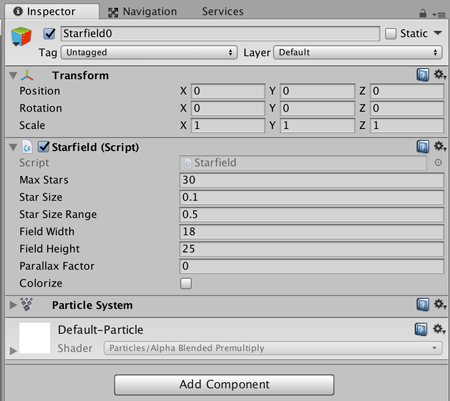
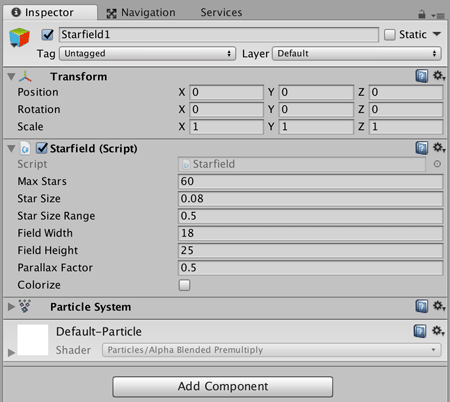
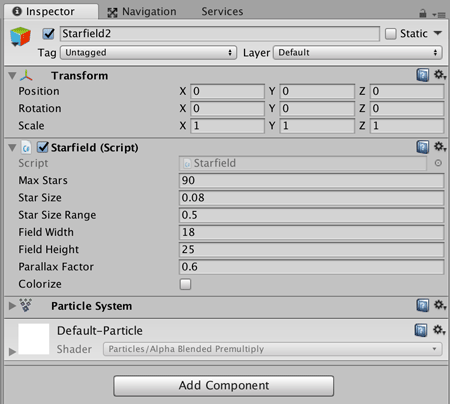


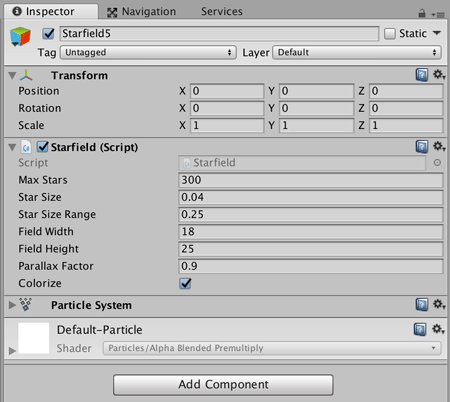
As you look over these settings you will notice that with each successive layer I am adding more and more stars while making them smaller and increasing the parallax factor. When you run your project with these objects in place, you should see a nice, dense starfield that scrolls across the screen as the camera moves across it and provides exactly the depth effect we’ve been looking for. One of the great things is that when checking the stats you will see that even though we are drawing many hundreds of stars, it is still achieved in a single render batch, making it extremely efficient.
Add Some Atmosphere
While this effect is really nice, what is truly missing, are some atmospheric effects to sell the illusion. As I mentioned before, when looking at photos from the Hubble telescope, you can see that there is more to Space than just stars. It is full of color and all sorts of astral bodies. To kind of mimic the effect, let’s add some “space haze.” For that purpose, I created a tileable, colorful texture of some billowing fog.

Naturally, it is not enough to simply paste the texture into the scene. We need to wave our effects wand with a flourish to sell it to the eye and say Visual Effecto!
Like we did with the stars, we want to create the illusion of depth and we best achieve that with motion. The idea is to take the texture and make it highly transparent so only hints of it are visible. We then make a copy of it and flip it horizontally. With an alpha-blended shader in place, this will give us a fairly organic looking effect that gets even better when the textures travel at different speeds, as the color blending makes sure the visual changes constantly.
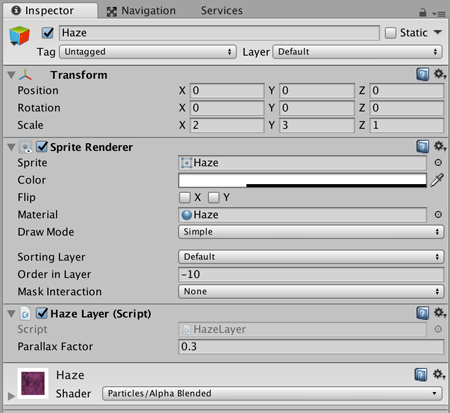
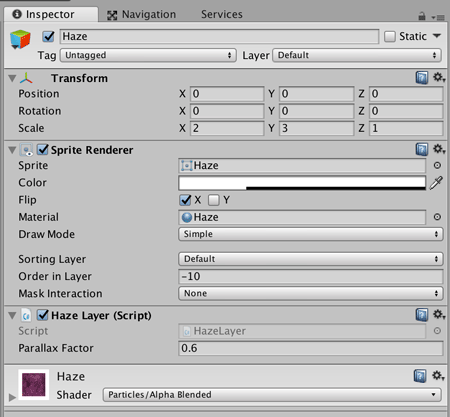
The first step to achieve this is by creating a material for the haze that we can then assign to the sprite renderer we will use to draw the haze on the screen.
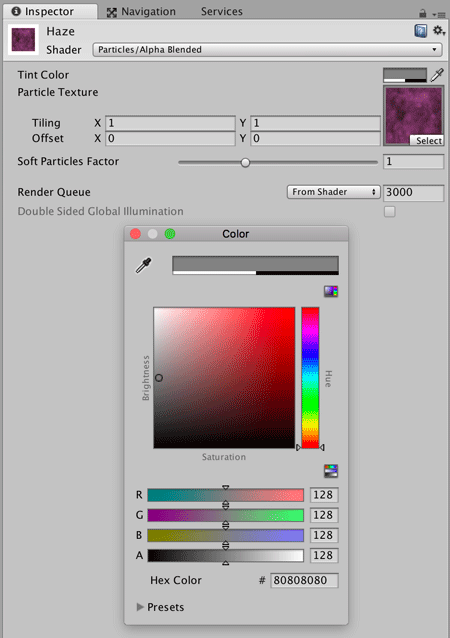
As you can see from the screenshot, I selected the Alpha Blended Particle Shader that Unity offers. Particle shaders are typically kept fairly simple and optimized for speed because they are often used to draw thousands of particles on the screen and should not choke the engine.
Next, we need a script that allows us to control the scrolling of the haze. Like we did with the stars, we want to create a parallax effect, so the principle is the same as before, offering a variable in the Unity editor that allows us to adjust the parallax speed.
using System.Collections;
using System.Collections.Generic;
using UnityEngine;

public class HazeLayer : MonoBehaviour
{
	public float	ParallaxFactor = 0f;

	Transform 		theCamera;
	Vector3				theDimension;

	Vector3				theStartPosition;

	void Start ()
	{
		theCamera = Camera.main.transform;
		theStartPosition = transform.position;

		theDimension = GetComponent().bounds.size;
	}

	void Update ()
	{
		Vector3 newPos = theCamera.position * ParallaxFactor;					// Calculate the position of the object
		newPos.z = 0;						// Force Z-axis to zero, since we're in 2D
		newPos.x += theStartPosition.x;
		newPos.y += theStartPosition.y;
		transform.position = newPos;

		EndlessRepeater ();
	}

	void EndlessRepeater ()
	{
		if ( theCamera.position.y > ( transform.position.y + theDimension.y ) )
		{
			theStartPosition.y += theDimension.y + theDimension.y;
		}
	}
}
As you can see, I’ve also included a small method that will repeat the texture endlessly. It works in tandem with a second, identical object. To make it work, I am stacking the two haze objects on top of each other along the y-axis. By lining them up seamlessly, they give me a long stretch of texture. The script attached to these objects will check when the object is becoming invisible at the bottom of the screen and will then simply stack it right back up on top of the other.
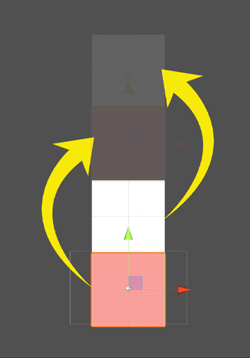
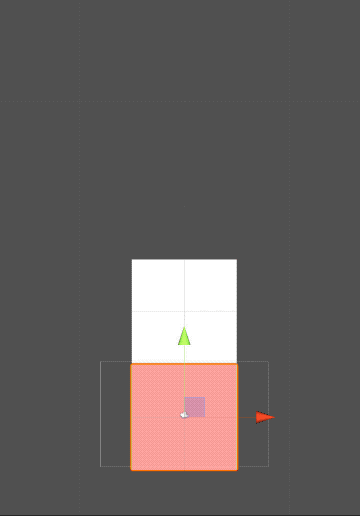
This hand-over-hand approach works perfectly and results in an endless strip of haze texture. I am placing the object in the back of the sprite render layer so it does not look as if it was pasted on top of everything but rather that it is the backdrop.
I then repeat the same thing, creating a second layer that is flipped along the x-axis to avoid visual artifacts. I also give it a different parallax speed, so that it moves differently from the previous layer. Because the haze texture is kind of undefined and without recognizable details, these two parallaxing layers will create the effect of drifting haze that has actual volume.

When you run this, you will see the beautiful quality of the wafting haze as the two layers drift against each other. Notice how they are undulating and highlighting different areas that are forever changing. It looks very organic but we can improve it even further with a really simple trick. We can change the opacity of the two layers as we go along, creating an even cooler effect where the layers of haze will fade in and out of each other almost unnoticeably.
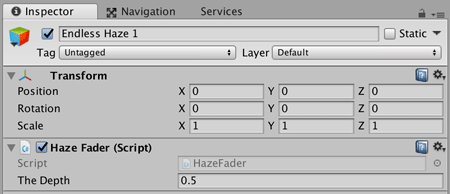
For that, I create a simple fader script called HazeFader.cs that I attach to the parent object of each haze layer.
Upon startup, the script picks a random fade value and a random duration. It then uses iTween, a free, external plugin that I am using very frequently, to fade from the current opacity of the object to the end opacity value determined by the randomizer. Once it reaches that end value, it repeats the same steps over and over again. This way, the script will constantly fade the texture in and out at random intervals using random opacities.
using System.Collections;
using System.Collections.Generic;
using UnityEngine;

public class HazeFader : MonoBehaviour
{
	public float					theDepth = 0.5f;

	Color									theColor;
	List	theRenderers;
	float									theFade = 1f;

	void Start ()
	{
		theRenderers = new List();

		foreach ( Transform child in transform )
		{
			SpriteRenderer sr = child.GetComponent();
			theRenderers.Add( sr );
			theColor = sr.color;
		}
		iTween.Init( this.gameObject );
		StartPhase ();
	}

	void Fader ( float _fade )
	{
		float _alpha = theColor.a * _fade;
		Color _newCol = new Color ( theColor.r, theColor.b, theColor.g, _alpha );

		foreach ( SpriteRenderer sr in theRenderers )
		{
			sr.color = _newCol;
		}
		theFade = _fade;
	}

	void StartPhase ()
	{
		float _duration = Random.Range ( 2f, 4f );
		float _newDest = Random.Range ( theDepth, 1f );
		float _delay = Random.Range ( 1f, 2f );

		iTween.ValueTo( this.gameObject, iTween.Hash( "from", theFade, "to" , _newDest, "delay", _delay, "time", _duration, "onupdate", "Fader", "oncomplete", "StartPhase" ) );
	}
}
Upon Start(), the script goes through each of the parent’s child objects and adds its respective renderer component to a list so it can be accessed quickly during the periodic method calls to update its opacity. It then starts the first phase by determining the random values and feeding them into iTween.
iTween makes it easy
If you’ve never worked with iTween before, the call might look a bit confusing, but it is really very simple. iTween is extremely powerful and will handle virtually any need you will ever have to manipulate objects and values over time.
iTween.ValueTo( this.gameObject, iTween.Hash( "from", theFade, "to" , _newDest, "delay", _delay, "time", _duration, "onupdate", "Fader", "oncomplete", "StartPhase" ) );
This call tells iTween for lerp between the “from” and the “to” values over the time period provided in “time,” starting after the delay period provided in “delay.” During each update, iTween will call my own Fader() function, passing this lerped value into it as a parameter. Once the lerp is complete, iTween will call my own StartPhase() function, which I use to restart the entire process.
iTween has many more parameters that give you full control over the process and you can apply it to virtually any object in your scene. Feel free to check out the documentation on the official website. Quite frankly, to me, iTween is the single-most valuable plugin for Unity and I find myself using it in every project to move, scale, rotate, fade or colorize objects, or to have them float along paths.
There you have it! Our completed scrolling starfield!
Starfield galore
Now it is up to you to experiment with it. Try to change up the parameters and see how it affects the look and overall effect. A good exercise would also be to try and colorize the haze layers so that they gradually change color over time. Use iTween to affect not only the alpha channel of the haze but the other colors as well and see how it turns out.
In my own build, I have also added a nebula, for example, that I placed along the way so that at some point it scrolls through the image. I am attaching a very simple parallaxing script to the object—the same as the ones we discussed here—so I can adjust how quickly it scrolls through the scene. It doesn’t require any further logic, so it passes once as a visually striking highlight and is gone forever.
Please share with me how your own experiments go and if you find any cool effects that help further heighten the illusion. I would really love to hear from you to see how it turns out for you and how you’ve used it in your own projects.
</maxstars;>
Hey thanks for the tutorial!
I noticed however when I scroll through the nebula there is faint line visible between the two nebula textures, any suggestions on how to fix this?
That’s really just a matter of the nebula texture itself, I would think. Make sure that around the edges of the texture it is fully transparent and no seams are visible.
I tried pulling the nebula jpg into photoshop and coverting to a png to change the transparency, unfortunately it made the change even more noticeable due to the sudden opacity shift… perhaps a gradient opacity fade from the center of the image might look better. In the end I just realized you just scroll the nebula material UVs after setting the wrap mode to repeat in the inspector.
http://wiki.unity3d.com/index.php/Scrolling_UVs
Anyways thanks agin for the tutorial!
Hello,
I’m trying to follow your tutorial as I love the result but… I’m having problems from the very beginning…
First: xOffset and yOffset are not declared… so it gives an error.
If I declare both of them and i hit play, I cannot see anything… I believe is because the particle system is not starting… I have started it manually on the editor and then I can see one single star… For sure I’m doing something wrong but… can you shed some light on this? Or even better… can you publish your project files?
Thanks a lot!
Best regards,
Hm, the stars start getting eaten up behind me and then vanish. Something is wrong, but I haven’t been able to figure out what to fix. Copy-pasted the code but.. something is off
@Loopywolf Make sure the Update() function is called. There are really simple checks in there to see if the star has left the screen and if it is, it simply repositions it back to the other side of the screen so it can be scrolled back in.
Do you have a final working template?
Do you have a working template bc I havent been able to generate starfield. I copy pasted the starfield.cs
Assets\Starfield.cs(27,3): error CS0103: The name ‘xOffset’ does not exist in the current context
You are correct, xOffset and yOffset were missing from the original listing. I’ve just added them to the code above. My apologies.
I have just uploaded the “Assets” file folder of my Unity project. Here is the link for you to grab it – http://guidohenkel.com/wp-content/uploads/2018/05/Starfield-Assets.zip
I’ve also attached it to the bottom of the article.
Hey Incredible tutorial man really giving me the effect i was hoping for 🙂
This is my first attempt in unity and really loving it.
Its working fine i flipped everything to scroll on the y axis because i just perfer the extra space for a space shooter 😛
I was running into trouble with the opacity changing on the upcoming layer before i reached it leaving a very noticible line.
I fixed this by putting both haze layers withing a parent and putting the haze fader script on that looking for the grandchildren so that it was effecting all layers simultaneously. perhaps i was doing something wrong to begin with???
Also I’m having a little trouble though with the criss crossing of the haze layers.
When I set different parralex factors on each it makes them sometimes show one then lines will appear as the other instananeously appears there doesnt seem to be any criss cross awesome effect your getting :/
Again amazing tutorial and awesome clean code style learned alot from you already and any help you can give would be greatly appriciated 😉
Dylan
Hi, I followed your tutorial and everything looks great in my project. Thanks by the way 🙂 However, I would love to put asteroids in my world in the same way the particles are spawned. I have many different sizes and shapes of asteroids (as prefabs), and I know how to put them in an array, but I am not sure how to call an array of objects in the code you provided. Imagine a decent amount of asteroids (of different color, shape, and size) being spawned like the stars do, and get deleted if too far away, but respawn ahead of you, so it looks seamless. Basically the same thing as the stars, but with asteroids. Is this possible?
Thank you.
It’s been too long since I wrote this so I don’t recall the exact details of the implementation but in general, yes, that should be possible without any problems. All you should have to do is implement a second particle system that spawns asteroids. Since the built-in particle system doesn’t easily allow you to modify the appearance of each particles, you would have to implement your own. Since your particle requirements are really minimal in a setup such as this—all you need are x/y velocities, trajectory vectors and positioning—this should be fairly easy to implement yourself. As you spawn each particles, you then simply pick a random one from your list and go with it.
Thanks for the info, it is much appreciated!
I would like to say that I’ve been playing with this over the weekend and one of the things I’ve done was change all of the Update() methods to FixedUpdate() so that they only run during the physics cycles (what some 20x’s per second?)
My reasoning for this is that the visual effects to be seen are really occurring off-screen, so the player never sees them anyway. By moving the updates to the physics cycle, I’ve noticed a significant performance increase (in my opinion anyway) from 1.9ms p/f to 1.5ms p/f using your example zip file above.
Just thought I’d let you know.
Thanks,
Thanks for the heads-up, Kickshaw. That’s a really good idea, moving it to the fixed update.
I really like the effect, thanks!
however, the haze costs a lot of performance on mobile, on my game it drops the fps from 35 to 25, ca you think of any way to achieving a similar haze effect with a smaller performance impact?
Fly, you may want to look at Kickshaw’s suggestion above, where he recommends moving the Update() code to the FixeDUpdate() callback instead.
Other than that, I would suggest trying different shaders to see how they perform by comparison. You might find a shader that is rendering the texture faster. I did absolutely no performance checking or optimization on this code because it was really just an academic exercise for me to put together, not something I’m actually using in any application myself.
Thanks for the answer Guido, the script cost is negligible, after some research I found out that alpha blending itself, simply is that expensive on mobile. It ramps up the fill-rate and there is not much that can be done against it. Fortunately, I found out that (screen) resolution scaling over the fixed DPI factor is a very handy tool address gpu bottlenecks on low end devices.
Update() in Starfield.cs cannot see the variable theCamera, it’s not declared anywhere in Starfield.cs so it won’t compile. Do you have a fully working script to download?
You can grab and declare the camera the exact same way it’s been done in `FixedScroll.cs`. I simply left that initialization part out for brevity.
Thanks for this, Guido! Is it possible to change the Starfield to run along Z axis for a 2.5d game?
Great tutorial – Thanks! I need to change the direction of the stars so they scroll horizontally rather than vertically. How can I achieve this?
In order to change the direction of the starfield, you simply have to modify the Update routine in the FixedScroll class to adjust the x or z position instead of the y position.
Hey, just tried to implement this in my existing game… kind of fumbled through. Guess I got it working right, but I do not like the fact that the camera flies away from my game scene! 😀
Any suggestions on how to animate the stars without moving the camera itself — or how to get my elements to follow the camera? Not sure if this would work without affecting the physics of my elements in-game.
Thanks!
The code for Awake() seems to be cut off?